Tom Parkinson's monthly column, introducing the diverse range of flora and fauna on show at Sanctuary Lakes.
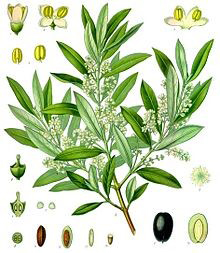
 One of the most successful non-native tree planting in Sanctuary Lakes is that most ancient of trees, the Olive (Olea europaea). The olive tree is native to the Mediterranean region and Western Asia. Amazingly fossilized leaves of Olea were found in the volcanic Greek island of Santorini and were dated about 37,000 BC. Edible olive has been cultivated for at least 7,000 years and as far back as 3,000 BC, olives were grown commercially in Crete and could have been the source of the wealth of the Minoan civilization.
Here in Sanctuary Lakes there are numerous plantings on common land. Just a few locations that are presently loaded with healthy green olives are the ten trees in Pelican Bay (next beach south of Partington Reserve); likewise trees adjacent to the 8th tee at the end of Times Square’s Lincoln Park Close and also off Times Square by the 11th tee at the end Staten Way. On either side of the bridge on the second island of Panorama Way almost a dozen young Kalamata Olive trees (wait till they are Black and fully ripe). Healthy Kalamata trees are also features in Morning Close and Viewbank Court, Cremorne Street and Middle Park Drive. That is just a sample; there are many other trees with fruit ready for picking.
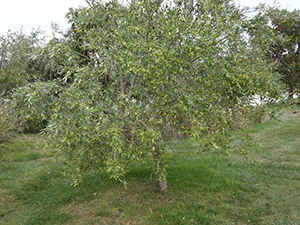
 One of Pelican Bay’s Olive trees weighed down with fruit It is that time of year again! The Olive picking and curing season has started.
Being fortunate enough to live on the Sanctuary Lake Resort, you can wander around, pick yourself a few kilos of ripe olives for free and spend a fun time curing your very own batch. Once you get into the habit, it's pretty simple and could make for a nice seasonal family tradition. Locally grown, home cured bowl of olives are a great kick off to any BBQ and they are always a talking point.
We have been enjoying experimenting curing olives from our Garden trees and the byways of Sanctuary Lakes for the past four years. After a number of variations (some successful, others disgusting), we find that we are happiest just using salt, water and that essential ingredient, patience. It doesn't get simpler than that, but it does take a bit of effort in the beginning and a lot of patience as they cure.
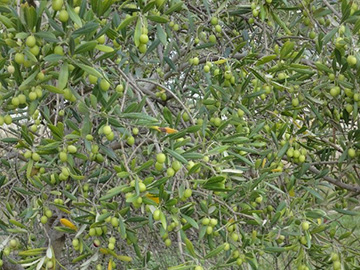
 Green Fruit ready for picking from a Staten Way Olive tree By not using more complicated cures you can wait to decide how to flavour or marinate them in herbs, oil and other tastes like garlic or lemons or maybe stuff them with red peppers or cheese.
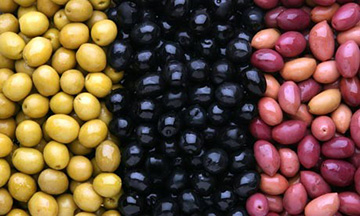
Before curing Olives, just a quickie on when to pick. All Olives will turn a dark purple black when ripe, but the full sized early green olive can also be cured into interesting tastes. Due to our strange weather patterns this year you have to pick by sight rather than timetable. Therefore the three stages for picking are:
Green: Picked when they have obtained full size, but before the ripening cycle has begun. Usually shades of green to yellow.
Semi-ripe or Turning Colour Olives: Picked at the beginning of the ripening cycle, when the colour has begun to change from green to multi-colour shades of red to brown. Only the skin is coloured as the flesh of the fruit lacks pigmentation at this stage, unlike that of ripe olives.
 Semi-ripe or Turning Colour Olives Black Olives or Ripe Olives: Picked at full maturity when fully ripe. Found in assorted shades of purple to brown to black.
Remember the trees on Sanctuary Lake’s common land are mainly "wild" Olive trees, so always check them when picking for any foreign elements and unnatural blemishes. I have always had perfect fruit in the last 4 years, but you have to check carefully.
Here now are three simple basic recipes for curing Olives. Firstly just water, then a simple Brine and lastly just salt. The water and brine are recipes from Wikihow and the Salt only from Nancy Gaifyllia. The salt used throughout curing must not be iodised, simple rock salt or kosher salt is perfect.
Water: This is the simplest but requires the most patience and can only be used with green olives. Green olives are actually just immature olives (like green tomatoes are immature tomatoes) and they are naturally pretty mild, so using water alone is sufficient to cure them. First thoroughly wash your olives, then crack them. You can literally “crack them” by wrapping the Olives in cloth and hitting them gently with a rolling pin or you can cut each one around lengthwise with a knife. Cutting is time consuming but it does the job a little better.
Place the olives in a plastic bin and cover with cold water. Use a food-grade plastic bin with a lid. Completely cover all of the olives with water, making sure none are poking out. You may need to weigh them down with something to keep them from floating above the surface of the water. Place the bin's cover tightly over the olives and put the container in a cool, dark place.
Make sure you change the water with fresh, cold water at least once a day. Don't forget, bacteria could build up in the water and taint the olives. Simply strain the olives through a colander, wash the bin, replace the olives and fill the bin back up with fresh cold water.
After one week of changing the water daily, taste an olive to see if it is as you like it. If it is, the olives are ready; if not try a few more days (changing the water daily) before moving on.
When you are happy with the taste, prepare a mixture of pickling salt, water and vinegar. This will preserve the olives and give them a delicious pickled taste. To make the brine, mix the following (makes enough for 2 kilos of olives): 1 litre cool water, a third of a cup of pickling salt and half a cup of white wine vinegar. Pour the Brine and the Olives into your storage container filling to the very top and make sure it is airtight. Prior to sealing, you may wish to add lemon peel, rosemary sprigs, roasted garlic, or black pepper to flavour the brine. Seal then store in a refrigerator, good for at least 12 months.
Brine: Both green and black olives may be cured in brine, a mixture of salt and water that preserves the olives and gives them a salty taste. This method takes longer than water brining, but it's the best method to use for ripe olives.
In order for the brine to be able to reach the insides of the olives, you'll need to slit the olives to let the moisture in. Make a vertical cut down the olive using a sharp knife; make sure not to cut the pit.
Pack the olives into glass jars with lids leaving an inch of space at the top.
Mix ¾ cup of salt with a 3 litres of cold water. Pour the brine into the jars so that it completely covers the olives. Seal the jar and store in a cool, dark place, such as the pantry or cellar.
During this time the olives will begin to brine. Leave the jars undisturbed to allow the salt and water to seep into the olives.
After one week, drain the olives and discard the medium brine, which will be full of bitter flavour. Keep the olives in the same glass containers. Mix 1½ cups of pickling salt with 3 litres of water. Pour this stronger brine over the olives to completely cover them and seal.
Store the olives for two months. Keep them in a cool place out of sunlight. At the end of two months, taste an olive to determine whether the bitterness level suits your taste. If not, change the brine again and store the olives for another month or two. This process can be repeated until you're happy with the way the olives taste.
Salt: Get a 2 kg plastic bucket and drill as many small holes (5mm) as you like in the lid and the base.
- Put a layer of Kalamata or Black olives fully covering the bottom of the bucket. Throw in a handful of rock salt over top of this layer.
- Continue olive then salt layer to the top of the bucket or until you run out of olives.
- Put on lid and leave for 24 hours.
- Turn bucket over. Leave for another 24 hours and turn bucket over again.
- Repeat this daily until the 5th day.
- Open bucket and taste an olive to check bitterness. Once again if olives are still too bitter for your taste - continue. If salt seems to have dissolved add a few handfuls of rock salt on top of olives.
- Continue turning bucket and checking on bitterness. Usually olives have reached their optimum taste after 10 to 14 days. Keep adding salt if salt has dissolved. NOTE: olive juice will seep out over this time so make sure the bucket has drainage beneath.
Once olives are to your taste they will look slightly wrinkled, wash thoroughly in fresh cold water until all salt is removed. Store in either Brine as above or a 50:50 mix of vinegar and olive oil plus of course your favourite herbs.
Another way of storage which is good for all olive varieties. Put the cured olives in zip-lock bags and keep in freezer until you need them. Olives will keep for years in the freezer.
When needed take the bag from the freezer and let it thaw naturally. (Do not put in water, microwave etc.)
Put olives in container and add 50:50 olive oil and vinegar to cover. Add herbs of your choice - basil, rosemary, chilli, garlic, oregano, lemon, dill.
The beauty of this method of storage is that each zip-lock bag can be made up separately as you need it and each can be flavoured separately so you can have plain or flavoured olives all year round.
For the cost of a bag of salt and a couple of plastic buckets, you are guaranteed terrific entertainment picking and curing your very own olives.
It's Harvest Time. They are your Olives so "Go for it!" and remember to just pick the fruit, not the branches.